Classes

Dorothy's Creative Classes and Workshops
Click here for more information about my classes and workshops!

Saturday, 2 February 2013

New Idea Book - Check it out!

The Spring Summer Idea book is now live, check out the great new products! 

Let me know if you'd like your own paper copy of the Idea Book, in the meantime you can check out the Idea Book online here at my shopping site.

Shrinking fabric handmade flower embelishements

This card was inspired by one of the cards in the new CTMH Idea Book.


The flower embelishment is made with some fabric scraps that I had from dresses made for my daughter when she was little. 
- Starting with rough circles cut from the fabric a little larger than what you want the end product to be.
- Use a small dowel or pencil, something that will not melt, to hold the centre of the cirle down, and quickly "hit" it with heat from an embossing gun. Play a little with it, each type of fabric can handle a different amount of heat.  It's really cool to see out the fabric shrinks up and puckers...
- Then simply stack a bunch together and sew a button on top.  I used a little piece of cardstock on the back to sew through so that I had something to glue down to the card.

Here's a picture of a pile of "shrunk" circles.  Don't they look just like a bunch of flower petals?


TeaBag Folding

I wanted to add a little something extra to this card and decided to try tea bag folding.  It's actually alot of fun to play with and creates a great outcome that looks really good on cards.  I found the directions online, if you google "teabag folding" you will get 100's of sites popping up.  I found this one had great instructions, here is the link to the instructions for this card. 


The medalian is made with 2" squares of paper.  I made the paper also, I used plain printer paper and coloured it using a spritzer pen from CTMH.  The mix in the spritzer pen was made with 6 drops of chocolate reinker, a blob of CTMH Create-a-Shade pearl paints and then filled up with water.  It takes a bit of shaking to get the pearl paints all mixed in, but it's a great look when complete and well worth the time spent shaking :-)

Clean and simple - Love the new For Always paper from CTMH!

Two options for the same card, one a valentines card and one a birthday card.  The valentines card could also be a happy anniversary card easily.


Measurements and recipe:
 - Card base - 5" x 9" piece of white cardstock scored at 5"
 - 1.5" x 5" piece of CTMH For Always cardstock, this is adhered on the edge of the 5x5 back  of the card base so it's visable from the front when card is closed.
 - The sentiment is mounted on a 1.5" x 3.25" of Whisper cardstock and it is stamped with Ruby ink on a 1.25" x 3" piece of white cardstock
 - The background for the images are a 2.75" x 2.75" square piece of Whisper cardstock with a 2.5" x 2.5" square piece of For Always patterned cardstock on top.
 - The flowers/hearts are from CTMH stamp sets and they are stamped in Ruby and Cotton Candy ink.
 - The little bit of bling is a CTMH round sparkle

I love the new For Always paper, especially paired with a pop of the beautiful rich Ruby ink.

Lighthouse Card - Edge Distressing

It's always hard to find a card for guys, it always seems easier to make a flowery pretty card :-)

This is the masculine Birthday card that I designed for my card class.   


Measurements and instructions:
 - Using a 8.5" x 5.5" craft cardstock, score at 2 1/8" from both sides to make a 5.5 x 4.25 card opening in the centre
 - Patterned paper in back is two pieces of cardstock from the retired CTMH Sonoma 2" x 5.25" each
 - The Colonial White cardstock base for the stamp is 3.25" x 3.75"
 - The matte for the image is Olive cardstock at 3.5" x 4"
 - The patterned strip along the bottom is the zip strip from the CTMH patterned paper that is the background paper.  It is two pieces both 1/2" x 2 1/8"
 - Stamp the image in Chocolate ink on the Colonial White cardstock
 - Using the CTMH edge distressor tool (such an awesome tool!) distress the edges of the colonial white and olive cardstock as well as the patterned zip strips.
 - Attach all pieces to the card base.

Thursday, 17 January 2013

Sunburst Cards -Mojo Monday Sketch

Just finished these, another card design for my card class coming up soon.  For this one I used Mojo Monday sketch #276 and I just had to try these sunburst cards that I've been seeing everywhere lately.


These were not all that difficult to do, just a lot of fiddling with adhesive :-)

The sunbursts were made from rectangles 1.5" x 4" that are then cut in half corner to corner to make two triangles.  The strip of grey dot paper on the bottom is 1.5" x 4.5" and the strip of patterned paper on the right is 1" x 4.25".

To make the cards, start with your card base and draw a line in pencil 1.5" from the bottom of the card and 1" from the right.  This is so that it's easy for you to see the area that needs to be covered by the sunburst design.

Now you need to arrange your triangles until you get it set in a way that covers all the area that needs to be covered, then you can glue them down.  
HINT: Not all the points have to meet, it actually works best if some of them are slightly longer, especially the shorter pieces on the left of the card.

Once all the triangles are glued, trim the tips where they meet if they are too bulky, then trim all the pieces all the way around the card to make it even.  

Now adhere the finishing pieces on the bottom and right of the card.

The sentiments are all cut with the Aritste cartridge and they are all from the same stamp set from CTMH.  The paper is a retired special pack from CTMH from last spring.

Happy crafting!!

Please contact me if you are interested in attending my card workshop or any of my other workshops.


Wednesday, 16 January 2013

One Sketch two Cards

Hi again....I know....more cards.  I am missing my scrapbooking, but I'm having fun making cards too! Sometimes I wish there were more hours in each day so I'd have more time to play!

I'm busy preparing for two private card workshops as well as the public one I'm holding in my home, and I was looking around from some inspiration.  I found a sketch on Deconstructed Sketches blog and got inspired.  I created these two cards with the exact same pieces, just moved them around a little bit.  I love the ability to use the inspiration from a sketch to create multiple cards.


Monday, 7 January 2013

Couple of cool stamp and ink techniques and Mojo Monday sketch

Hello again!  I needed to make a couple of congrats cards for two co-workers who are moving to bigger and better things within the organization.  I knew that I wanted to use resit embossing, just because I haven't used my heat embosser in such a long time, but I needed inspiration for the card.  I found it in the Mojo Monday #275 sketch!

Here's the card, then I'll tell you how I created it.


To create the panel that is the background of this card, I started with a piece of colonial white cardstock 1/4 inch smaller than the card front.  I then used a stamp from the Friends stamp set from CTMH and stamped/embossed with clear embossing powder.  This was just done with random stamping, making sure that some of them go off the edge of the paper.

I then used 4 ink colours, Honey, Sunset, Ruby and Barn Red and used wedges of sponge to randomly ink up the entire piece of paper, making sure to really rub it in around the embossing. Start with the lightest ink and move to the darkest for best results, and use a different sponge for each colour.  I have a baggie of sponge wedges, with a small piece of paper with the colour written on it stapled to each one, works great!

The other papers on the card are Autumn Taracotta, Ruby and Desert Sand.

The medallion with Congrats in it is the same stamp used on the background, but I masked the centre so that I would have a spot to stamp the word congrats.  To mask part of the stamp, stamp it on a scrap piece of paper and cut out the centre, then using removable adhesive, position the centre on the piece you are going to stamp.  Then the beauty of the clear stamps comes into play, you can line things up and stamp the image over that piece perfectly, then simply remove the scrap piece from the centre and then stamp the congrats.

I used the sponge wedge and Barn Red ink to ink the edges of all paper pieces and the card itself, just to finish things off.

Here is the inside of the card and below is how I did this:


Using one of the sentiment stamp sets from CTMH I placed all the words that I wanted to be part of this down on the page face down as they would be stamped, then once all arranged, simply press the block to the stamps and ta-da you have a custom made stamp to ink up and use :-)

Friday, 4 January 2013

Valentines Day Card Workshop for Kids

Date:  Sunday February 3
Time: 1:00 pm – 4:30 pm
Where: At my home
Cost: $20

Each will go home with 20 classmate cards, 5 each of the 4 designs, and one special Treat Tube card for their teacher.

All supplies required as well as a snack of cookies and milk/juice will be provided.

The classmate cards are 3x3 inches and use some basic stamping, cutting and adhesive techniques.


Please email me at dorothyseiler@hotmail.ca to reserve a spot.

Below are close ups of each of the cards.  I used some sketches from some challenge blogs as my inspiration for each of these cards.  I will note with each one which challenge inspired it.

This card was inspired by sketch #67 at Freshly Made Sketches.


This card was inspired by sketch #191 at Unscripted Sketches.

This card was inspired by sketch #83 at Deconstructed Sketches.


This card was inspired by sketch #44 at Retro Sketches.


The treat tube for teacher is inspired by the Whooo's Your Valentine January special from Close to My Heart.  All the stamps as well as the silver glitter paper are all from the Whooo's Your Valentine kit also.

Save your spot soon, the size of the group that I can accommodate is limited!

Tuesday, 25 December 2012

Resolutions

Happy Holidays to everyone!!!  I hope your holiday's are going well so far, and that the rest of the next week and a bit are full of love, laughs, friends and family!

I've always been very bad at the whole resolution thing, I think it's the fact that in order to make a real and lasting change in your life it has to be something that you are doing for reasons that resonate and are important to you, not just because it was time to make a New Year's resolution. 

My sister posted an idea on Facebook a week or so ago about having a mason jar and some note squares and writing the good things that happen each and every day down and storing them all in the mason jar for review the next year.  This is a great idea for remembering what's important and realizing that there are so many good things happening each and every day.  My husband has also started something over this last year called a "rainy day letter".  It's along the same principle, that you keep note of the good things that happen each and every day and the things that make you happy, but rather than waiting until the end of the year to read and review them, you take it out on a rainy day, when you are feeling down and out.

I decided to combine the two and I made this for my hubby for his Christmas present.  I think now I'm going to make one for others in my family, including a cousin just starting her journey through cancer.


Here's the box from the outside.  It's a drop spine box that I made from scratch using some book board that I had in my stash and paper from the Pemberly paper pack from CTMH.


Inside the drop spine box is a hard covered journal that is made with a chain stitch binding.  The journal fits perfect inside the box and leaves lots of space to add pictures and other bits and pieces.
 

Here is a picture of the spine of the journal showing the chain stitch binding.  Above is a view of how nicely the journal opens because of the chain stitch, it opens flat and is very easy for writing in!

I'm waiting for the CTMH Spring/Summer 2013 catalog to arrive here before I design the vacation mini-album that I'm going to offer for my March class, but ideas are already going through my head and I'm thinking that maybe a drop spine box with both a journal and a mini-album inside sounds great and I'm sure once the catalog arrives (I can't wait!!!) and I see the wonderful summer and vacation papers and stamps in it that I'm going to have tons of ideas going through my head!!!

 Sending you wishes for happiness and joy for the rest of the holiday season and for the entire new year!!!

Friday, 23 November 2012

I wish I owned embossing folders.....

One tool that I do not have in my scraproom "yet" is an embossing machine of some sort...I have a couple of the old fashioned embossing plates and an embossing stylus, but making this card reminded me of just how long and tedious it is to use those!  Some day I'll collect enough $ together to get myself one...until then, don't think I'm going to do this hand embossing thing again!

Here's the card I made while watching Big Bang and Glee with the kids last night.


I only embossed 4 snowflakes on the card base and that took forever!

The large snowflake is cut with my Cricut Art Philosophy cartridge and stamped with two images from the snowflake stamp set.  I love the two stage stamps and the look you can get so easily with the clear stamps.

I'm entering this card in the Unscripted Sketches piggyback challenge #185 as well as the CAS-ual Fridays challenge CFC79.

Monday, 19 November 2012

H2H Christmas Challenge!

This week's challenge at Heart 2 Heart is another Christmas week.

It's amazing how quickly Christmas is sneaking up on us so fast!  What crafty things are you doing to prepare for Christmas?  Are you making a special album for someone, beautiful hand made cards to get in the mail, or some other project?

I've been busy with lots and lots of cards, I have had 3 Christmas card classes and had a great time at all three, now I need to make up some more and get my cards in the mail :-)

Because I've been so much in card mode, I decided to do a layout for this challenge, and I'm happy I did.  I now have a layout ready to just add this year's pictures to.  The photo mattes I just adhered with removable adhesive, so that I had some options depending on the pictures.  The sketch for this layout is from the CTMH Make it From the Heart book, great inspiration and I love that I can get 7 pictures on this layout!


Head on over to the Heart 2 Heart Challenges blog to check out the other awesome Christmas inspiration.

I’d love to see your Christmas creations too!  Here's how to join in this week's challenge:
  1. Use mostly Close To My Heart products, though it doesn't have to be 100%.
  2. Create your Christmas creation
  3. Post your project to your blog or other online gallery.
  4. Come back here and directly link to your blog post, not your blog home page. 
  5. Mention Heart 2 Heart somewhere in your blog post indicating that you are playing along with us and link to our site. 
  6. Consider adding the H2H badge to your blog. We'd love to spread the word and see more crafters participating! 
  7. Finally, you have the whole month of November to join us on any of our November challenges and be eligible for our Top Ten!

Friday, 16 November 2012

Getting some scrapbook pages done!!


I've been so busy making cards lately, that I'm starting to miss scrapbooking!  I was able to spend some great time scrapbooking this week, and it felt so great, definitely going to keep the balance!


You all know how much I love to use sketches for inspiration, one of the scrapbook sketch sites I love is Sketch N Scrap.  They are looking for design team members right now, and with the Heart 2 Heart Challenges design team coming to an end, this is the perfect time!  Here is a layout I created based on the Sketch N Scrap DT call, the left page is the DT sketch and the right is the companion page I came up with for the other two pictures in this series and the journaling.


 I was also inspired by the current Moxie Fab World Challenge and found a cool new use for the CTMH burlap ribbon. I used it to stamp the background behind the title and I also used some strands pulled from it to wrap around the first letters in the title to make them stand out.  Small touches, but effective I think.

The paper used is one of my current CTMH favourites, Avonlea!

Monday, 12 November 2012

Cutting 4 card bases from one 12x12 paper

A week ago I had the privilege of meeting a wonderful group of ladies who get together regularly to make cards.  I introduced them to CTMH and we created two cards and had a great time!

One thing I learnt from them is that not everyone is a scrapbooker (gasp!).  Because they do not scrapbook, they do not regularly use 12x12 cardstock.  They usually use 8.5x11 cardstock cut in half to make two 4.25x5.5 cards.

There are many ways to get the most out of a 12x12 sheet of cardstock when making card bases.  I'm going to make an effort to create and post a few of them over the next week or so.

Here is my first one.  This one will give you two standard 4.25x5.5 cards, as well as two 3x3 cards, with one 1x8.5 scrap and two .5x5 scraps.

Here is a picture after I cut the papers, with the measurements written on it.


To cut this, first cut the 12x12 sheet at 3.5 inches, you will then have a 3.5x12 piece and a 8.5x12 piece.  Now cut 1 inch off the long side of the 8.5x12 piece so that you are left with an 8.5x11 piece of paper that you can cut in half at 5.5 to get you your two standard card bases. Now, cut the 3.5x12 piece in half at 6 inches, then trim .5 inches off each one so that you end up with two 3x6 card bases.

3x3 cards are perfect size for quick little pick me up cards and they also work great if you punch a hole in the upper left corner and use it as a tag on a gift bag or gift.  If you are wondering about envelopes for this size card, CTMH does sell them, they are so cute and tiny..

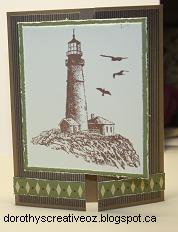
The previous two posts are the standard sized cards I made with these card bases, below are the two 3x3 cards I made with the other two card bases.


For this card I used a mosiac tile technique, to do this technique, start with a piece of cardstock about 1/8th of an inch smaller than 3x3 and stamp the stamp image on it. Then I used the great CTMH alcohol markers to colour the image. Then I cut the image up into squares, these are not very even, but I like the effect anyway.  Then I glued the pieces down to a 3x3 piece of Olive cardstock leaving a small amount of space between each. That then became the card front.


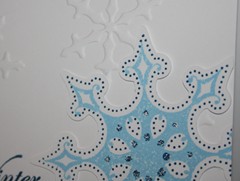
For my second 3x3 card, I used the Perfect day stamp set and chocolate ink to create an all stamp card, I really like the effect, especially with the Desert Sand ink sponged around the edges of the card. What a perfect pick me up card!

I hope that helps give some ideas for using 12x12 paper for card bases.  Thanks for looking.

Playing with some new products

I've had the CTMH Create-A-Shade Pearl Paint for a while, but hadn't had a chance to play with it.  I really like it, it creates a translucent shimmer on the paper when used untinted.  Next I'm going to have to try it tinted with some reinker, I can see that will look great!  On the card below, it's hard to see in the picture, but the swirl as well as the edges of the petals on the flowers are painted with the pearl paint.


This card was created using the retired Roxie paper pack.  The swirl and the flowers were cut using the CTMH Artiste Cricut cartridge.  Also used on here is the hemp twine from CTMH.  The edges of all the paper was distressed using a distressing tool (love mine!!) and I used my handy sewing machines to sew around the edge of the card base, another look that I love.  I need to re-organize my craft space so that I can have my sewing machine available so that I will use it more often.

I'm entering this card in the Mojo Monday sketch challenge this week.

Thanks for looking!

Really Cool Chevron Pattern

I was spending some time in Pinterest today (wow, it's easy to spend too much time there!) and a saw a couple of different cards with a neat Chevron pattern that I just had to figure out. Here's the card I ended up making, I'll explain how to do the chevron's below.


For each row of chevron's I cut 5 pieces of double sided patterned paper at 0.5 inch by 1.5 inch. Then I folded over each end of the strips to make the little triangles. Then you glue the strips down, with the triangles matching up to make the little squares that are not glued down.

All supplies used for this card are from CTMH.  The paper is from a retired paper pack called Roxie that I still have in my stash.  The burlap ribbon is my favourite embellishment from the current catalogue.

I'm entering this card in the Retro Sketches challenge as well as the Simply Create Use your stash challenge and the Moxie Fab World Challenge.  Check out these challenge pages and play along!!!


Sunday, 4 November 2012

Unscripted Sketches #183

I love sanding CTMH papers, the white core makes this distressing technique give the paper such a great look! I also tried a new idea for using the Framed stamp set from CTMH, rather than putting it on a separate cut out, I stamped it right on the background of this card.

The shapes on this card were cut with the awesome Artiste cricut cartridge, I use it sooo much now!

I'm making this card with a great group of ladies tomorrow evening at a gathering, I'm so looking forward to it!

Check out Unscripted Sketches for other great inspiration....especially the wonderful card from guest designer Laura, using some CTMH stamps :-)


Monday, 29 October 2012

One Sketch, Two Totally Different Cards

More cards needed for some co-workers, so I turned to Mojo Monday for a sketch inspiration.  These were super quick to put together! This is Mojo Monday Sketch 265.


I think this paper (CTMH La Belle en Vie) is becoming my new go to paper for "girlie" cards that aren't too girlie!  The dots around the edge of the purple square were done by using the stitching guide on the awesome CTMH ruler to poke evenly spaced holes in the paper, then I used the backside as the front and just took a piece of sandpaper to it to highlight the holes.  The flowers leaves and butterfly were all cut from the new CTMH Artiste Cricut Cartridge.  Of course, the piece of frayed burlap ribbon is a must on all my cards now it seems ;-)

Here is the second card, a plain and simple card using a retired paper pack from CTMH.  Perfect for a guy!

Happy creating!!!

Thursday, 25 October 2012

Christmas Card Workshop Sneak Peek!

Here's a sneak peek at one of the cards that we will be doing at my Christmas Card workshop.  I actually love this card and can't wait to show you this cool technique!

I have a couple of spots left and when full will set up a second workshop, so let me know if you are interested! Check out my full workshop list here .


Tuesday, 23 October 2012

Heart 2 Heart Challenges - Something Halloween

This week's challenge at Heart 2 Heart is to create something for Halloween and/or involving pumpkins.  I don't know why, but I had a very hard time with this one.  With my kids being older now and no longer doing the Trick or Treat thing, I don't have Halloween costume pictures to scrap every year, and also don't have the pumpkin picking and carving pictures to scrap either!

I ended up trying out a new technique with a suspended element in the window of a card, and I actually really like how it turned out!  I'm going to have to incorporate this idea in some Christmas cards I think!

Here's my spidy card.


It's a pretty clean and simple card, but I like the effect.  I think next time I would use either beige or black thread to string up spidy, the white is a little too visable.  Hmmm....I think I'm going to have to dig, I think I have some clear thread somewhere that I should try!

The paper is last year's Halloween paper pack.  The spider and the word Halloween are both cut from the Artiste cartridge.

Head on over to Heart 2 Heart Challenges to show us your Halloween creations!

Thanks for looking!!!