Classes

Dorothy's Creative Classes and Workshops
Click here for more information about my classes and workshops!

Saturday 2 February 2013

New Idea Book - Check it out!

The Spring Summer Idea book is now live, check out the great new products! 

Let me know if you'd like your own paper copy of the Idea Book, in the meantime you can check out the Idea Book online here at my shopping site.

Shrinking fabric handmade flower embelishements

This card was inspired by one of the cards in the new CTMH Idea Book.


The flower embelishment is made with some fabric scraps that I had from dresses made for my daughter when she was little. 
- Starting with rough circles cut from the fabric a little larger than what you want the end product to be.
- Use a small dowel or pencil, something that will not melt, to hold the centre of the cirle down, and quickly "hit" it with heat from an embossing gun. Play a little with it, each type of fabric can handle a different amount of heat.  It's really cool to see out the fabric shrinks up and puckers...
- Then simply stack a bunch together and sew a button on top.  I used a little piece of cardstock on the back to sew through so that I had something to glue down to the card.

Here's a picture of a pile of "shrunk" circles.  Don't they look just like a bunch of flower petals?


TeaBag Folding

I wanted to add a little something extra to this card and decided to try tea bag folding.  It's actually alot of fun to play with and creates a great outcome that looks really good on cards.  I found the directions online, if you google "teabag folding" you will get 100's of sites popping up.  I found this one had great instructions, here is the link to the instructions for this card. 


The medalian is made with 2" squares of paper.  I made the paper also, I used plain printer paper and coloured it using a spritzer pen from CTMH.  The mix in the spritzer pen was made with 6 drops of chocolate reinker, a blob of CTMH Create-a-Shade pearl paints and then filled up with water.  It takes a bit of shaking to get the pearl paints all mixed in, but it's a great look when complete and well worth the time spent shaking :-)

Clean and simple - Love the new For Always paper from CTMH!

Two options for the same card, one a valentines card and one a birthday card.  The valentines card could also be a happy anniversary card easily.


Measurements and recipe:
 - Card base - 5" x 9" piece of white cardstock scored at 5"
 - 1.5" x 5" piece of CTMH For Always cardstock, this is adhered on the edge of the 5x5 back  of the card base so it's visable from the front when card is closed.
 - The sentiment is mounted on a 1.5" x 3.25" of Whisper cardstock and it is stamped with Ruby ink on a 1.25" x 3" piece of white cardstock
 - The background for the images are a 2.75" x 2.75" square piece of Whisper cardstock with a 2.5" x 2.5" square piece of For Always patterned cardstock on top.
 - The flowers/hearts are from CTMH stamp sets and they are stamped in Ruby and Cotton Candy ink.
 - The little bit of bling is a CTMH round sparkle

I love the new For Always paper, especially paired with a pop of the beautiful rich Ruby ink.

Lighthouse Card - Edge Distressing

It's always hard to find a card for guys, it always seems easier to make a flowery pretty card :-)

This is the masculine Birthday card that I designed for my card class.   


Measurements and instructions:
 - Using a 8.5" x 5.5" craft cardstock, score at 2 1/8" from both sides to make a 5.5 x 4.25 card opening in the centre
 - Patterned paper in back is two pieces of cardstock from the retired CTMH Sonoma 2" x 5.25" each
 - The Colonial White cardstock base for the stamp is 3.25" x 3.75"
 - The matte for the image is Olive cardstock at 3.5" x 4"
 - The patterned strip along the bottom is the zip strip from the CTMH patterned paper that is the background paper.  It is two pieces both 1/2" x 2 1/8"
 - Stamp the image in Chocolate ink on the Colonial White cardstock
 - Using the CTMH edge distressor tool (such an awesome tool!) distress the edges of the colonial white and olive cardstock as well as the patterned zip strips.
 - Attach all pieces to the card base.

Thursday 17 January 2013

Sunburst Cards -Mojo Monday Sketch

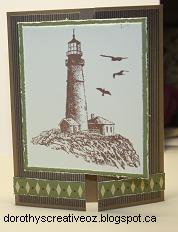
Just finished these, another card design for my card class coming up soon.  For this one I used Mojo Monday sketch #276 and I just had to try these sunburst cards that I've been seeing everywhere lately.


These were not all that difficult to do, just a lot of fiddling with adhesive :-)

The sunbursts were made from rectangles 1.5" x 4" that are then cut in half corner to corner to make two triangles.  The strip of grey dot paper on the bottom is 1.5" x 4.5" and the strip of patterned paper on the right is 1" x 4.25".

To make the cards, start with your card base and draw a line in pencil 1.5" from the bottom of the card and 1" from the right.  This is so that it's easy for you to see the area that needs to be covered by the sunburst design.

Now you need to arrange your triangles until you get it set in a way that covers all the area that needs to be covered, then you can glue them down.  
HINT: Not all the points have to meet, it actually works best if some of them are slightly longer, especially the shorter pieces on the left of the card.

Once all the triangles are glued, trim the tips where they meet if they are too bulky, then trim all the pieces all the way around the card to make it even.  

Now adhere the finishing pieces on the bottom and right of the card.

The sentiments are all cut with the Aritste cartridge and they are all from the same stamp set from CTMH.  The paper is a retired special pack from CTMH from last spring.

Happy crafting!!

Please contact me if you are interested in attending my card workshop or any of my other workshops.


Wednesday 16 January 2013

One Sketch two Cards

Hi again....I know....more cards.  I am missing my scrapbooking, but I'm having fun making cards too! Sometimes I wish there were more hours in each day so I'd have more time to play!

I'm busy preparing for two private card workshops as well as the public one I'm holding in my home, and I was looking around from some inspiration.  I found a sketch on Deconstructed Sketches blog and got inspired.  I created these two cards with the exact same pieces, just moved them around a little bit.  I love the ability to use the inspiration from a sketch to create multiple cards.