Classes

Dorothy's Creative Classes and Workshops
Click here for more information about my classes and workshops!

Tuesday, 25 December 2012

Resolutions

Happy Holidays to everyone!!!  I hope your holiday's are going well so far, and that the rest of the next week and a bit are full of love, laughs, friends and family!

I've always been very bad at the whole resolution thing, I think it's the fact that in order to make a real and lasting change in your life it has to be something that you are doing for reasons that resonate and are important to you, not just because it was time to make a New Year's resolution. 

My sister posted an idea on Facebook a week or so ago about having a mason jar and some note squares and writing the good things that happen each and every day down and storing them all in the mason jar for review the next year.  This is a great idea for remembering what's important and realizing that there are so many good things happening each and every day.  My husband has also started something over this last year called a "rainy day letter".  It's along the same principle, that you keep note of the good things that happen each and every day and the things that make you happy, but rather than waiting until the end of the year to read and review them, you take it out on a rainy day, when you are feeling down and out.

I decided to combine the two and I made this for my hubby for his Christmas present.  I think now I'm going to make one for others in my family, including a cousin just starting her journey through cancer.


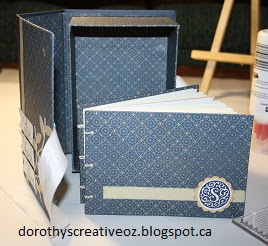
Here's the box from the outside.  It's a drop spine box that I made from scratch using some book board that I had in my stash and paper from the Pemberly paper pack from CTMH.


Inside the drop spine box is a hard covered journal that is made with a chain stitch binding.  The journal fits perfect inside the box and leaves lots of space to add pictures and other bits and pieces.
 

Here is a picture of the spine of the journal showing the chain stitch binding.  Above is a view of how nicely the journal opens because of the chain stitch, it opens flat and is very easy for writing in!

I'm waiting for the CTMH Spring/Summer 2013 catalog to arrive here before I design the vacation mini-album that I'm going to offer for my March class, but ideas are already going through my head and I'm thinking that maybe a drop spine box with both a journal and a mini-album inside sounds great and I'm sure once the catalog arrives (I can't wait!!!) and I see the wonderful summer and vacation papers and stamps in it that I'm going to have tons of ideas going through my head!!!

 Sending you wishes for happiness and joy for the rest of the holiday season and for the entire new year!!!

Friday, 23 November 2012

I wish I owned embossing folders.....

One tool that I do not have in my scraproom "yet" is an embossing machine of some sort...I have a couple of the old fashioned embossing plates and an embossing stylus, but making this card reminded me of just how long and tedious it is to use those!  Some day I'll collect enough $ together to get myself one...until then, don't think I'm going to do this hand embossing thing again!

Here's the card I made while watching Big Bang and Glee with the kids last night.


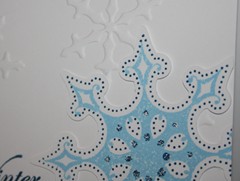
I only embossed 4 snowflakes on the card base and that took forever!

The large snowflake is cut with my Cricut Art Philosophy cartridge and stamped with two images from the snowflake stamp set.  I love the two stage stamps and the look you can get so easily with the clear stamps.

I'm entering this card in the Unscripted Sketches piggyback challenge #185 as well as the CAS-ual Fridays challenge CFC79.

Monday, 19 November 2012

H2H Christmas Challenge!

This week's challenge at Heart 2 Heart is another Christmas week.

It's amazing how quickly Christmas is sneaking up on us so fast!  What crafty things are you doing to prepare for Christmas?  Are you making a special album for someone, beautiful hand made cards to get in the mail, or some other project?

I've been busy with lots and lots of cards, I have had 3 Christmas card classes and had a great time at all three, now I need to make up some more and get my cards in the mail :-)

Because I've been so much in card mode, I decided to do a layout for this challenge, and I'm happy I did.  I now have a layout ready to just add this year's pictures to.  The photo mattes I just adhered with removable adhesive, so that I had some options depending on the pictures.  The sketch for this layout is from the CTMH Make it From the Heart book, great inspiration and I love that I can get 7 pictures on this layout!


Head on over to the Heart 2 Heart Challenges blog to check out the other awesome Christmas inspiration.

I’d love to see your Christmas creations too!  Here's how to join in this week's challenge:
  1. Use mostly Close To My Heart products, though it doesn't have to be 100%.
  2. Create your Christmas creation
  3. Post your project to your blog or other online gallery.
  4. Come back here and directly link to your blog post, not your blog home page. 
  5. Mention Heart 2 Heart somewhere in your blog post indicating that you are playing along with us and link to our site. 
  6. Consider adding the H2H badge to your blog. We'd love to spread the word and see more crafters participating! 
  7. Finally, you have the whole month of November to join us on any of our November challenges and be eligible for our Top Ten!

Friday, 16 November 2012

Getting some scrapbook pages done!!


I've been so busy making cards lately, that I'm starting to miss scrapbooking!  I was able to spend some great time scrapbooking this week, and it felt so great, definitely going to keep the balance!


You all know how much I love to use sketches for inspiration, one of the scrapbook sketch sites I love is Sketch N Scrap.  They are looking for design team members right now, and with the Heart 2 Heart Challenges design team coming to an end, this is the perfect time!  Here is a layout I created based on the Sketch N Scrap DT call, the left page is the DT sketch and the right is the companion page I came up with for the other two pictures in this series and the journaling.


 I was also inspired by the current Moxie Fab World Challenge and found a cool new use for the CTMH burlap ribbon. I used it to stamp the background behind the title and I also used some strands pulled from it to wrap around the first letters in the title to make them stand out.  Small touches, but effective I think.

The paper used is one of my current CTMH favourites, Avonlea!

Monday, 12 November 2012

Cutting 4 card bases from one 12x12 paper

A week ago I had the privilege of meeting a wonderful group of ladies who get together regularly to make cards.  I introduced them to CTMH and we created two cards and had a great time!

One thing I learnt from them is that not everyone is a scrapbooker (gasp!).  Because they do not scrapbook, they do not regularly use 12x12 cardstock.  They usually use 8.5x11 cardstock cut in half to make two 4.25x5.5 cards.

There are many ways to get the most out of a 12x12 sheet of cardstock when making card bases.  I'm going to make an effort to create and post a few of them over the next week or so.

Here is my first one.  This one will give you two standard 4.25x5.5 cards, as well as two 3x3 cards, with one 1x8.5 scrap and two .5x5 scraps.

Here is a picture after I cut the papers, with the measurements written on it.


To cut this, first cut the 12x12 sheet at 3.5 inches, you will then have a 3.5x12 piece and a 8.5x12 piece.  Now cut 1 inch off the long side of the 8.5x12 piece so that you are left with an 8.5x11 piece of paper that you can cut in half at 5.5 to get you your two standard card bases. Now, cut the 3.5x12 piece in half at 6 inches, then trim .5 inches off each one so that you end up with two 3x6 card bases.

3x3 cards are perfect size for quick little pick me up cards and they also work great if you punch a hole in the upper left corner and use it as a tag on a gift bag or gift.  If you are wondering about envelopes for this size card, CTMH does sell them, they are so cute and tiny..

The previous two posts are the standard sized cards I made with these card bases, below are the two 3x3 cards I made with the other two card bases.


For this card I used a mosiac tile technique, to do this technique, start with a piece of cardstock about 1/8th of an inch smaller than 3x3 and stamp the stamp image on it. Then I used the great CTMH alcohol markers to colour the image. Then I cut the image up into squares, these are not very even, but I like the effect anyway.  Then I glued the pieces down to a 3x3 piece of Olive cardstock leaving a small amount of space between each. That then became the card front.


For my second 3x3 card, I used the Perfect day stamp set and chocolate ink to create an all stamp card, I really like the effect, especially with the Desert Sand ink sponged around the edges of the card. What a perfect pick me up card!

I hope that helps give some ideas for using 12x12 paper for card bases.  Thanks for looking.

Playing with some new products

I've had the CTMH Create-A-Shade Pearl Paint for a while, but hadn't had a chance to play with it.  I really like it, it creates a translucent shimmer on the paper when used untinted.  Next I'm going to have to try it tinted with some reinker, I can see that will look great!  On the card below, it's hard to see in the picture, but the swirl as well as the edges of the petals on the flowers are painted with the pearl paint.


This card was created using the retired Roxie paper pack.  The swirl and the flowers were cut using the CTMH Artiste Cricut cartridge.  Also used on here is the hemp twine from CTMH.  The edges of all the paper was distressed using a distressing tool (love mine!!) and I used my handy sewing machines to sew around the edge of the card base, another look that I love.  I need to re-organize my craft space so that I can have my sewing machine available so that I will use it more often.

I'm entering this card in the Mojo Monday sketch challenge this week.

Thanks for looking!

Really Cool Chevron Pattern

I was spending some time in Pinterest today (wow, it's easy to spend too much time there!) and a saw a couple of different cards with a neat Chevron pattern that I just had to figure out. Here's the card I ended up making, I'll explain how to do the chevron's below.


For each row of chevron's I cut 5 pieces of double sided patterned paper at 0.5 inch by 1.5 inch. Then I folded over each end of the strips to make the little triangles. Then you glue the strips down, with the triangles matching up to make the little squares that are not glued down.

All supplies used for this card are from CTMH.  The paper is from a retired paper pack called Roxie that I still have in my stash.  The burlap ribbon is my favourite embellishment from the current catalogue.

I'm entering this card in the Retro Sketches challenge as well as the Simply Create Use your stash challenge and the Moxie Fab World Challenge.  Check out these challenge pages and play along!!!


Sunday, 4 November 2012

Unscripted Sketches #183

I love sanding CTMH papers, the white core makes this distressing technique give the paper such a great look! I also tried a new idea for using the Framed stamp set from CTMH, rather than putting it on a separate cut out, I stamped it right on the background of this card.

The shapes on this card were cut with the awesome Artiste cricut cartridge, I use it sooo much now!

I'm making this card with a great group of ladies tomorrow evening at a gathering, I'm so looking forward to it!

Check out Unscripted Sketches for other great inspiration....especially the wonderful card from guest designer Laura, using some CTMH stamps :-)


Monday, 29 October 2012

One Sketch, Two Totally Different Cards

More cards needed for some co-workers, so I turned to Mojo Monday for a sketch inspiration.  These were super quick to put together! This is Mojo Monday Sketch 265.


I think this paper (CTMH La Belle en Vie) is becoming my new go to paper for "girlie" cards that aren't too girlie!  The dots around the edge of the purple square were done by using the stitching guide on the awesome CTMH ruler to poke evenly spaced holes in the paper, then I used the backside as the front and just took a piece of sandpaper to it to highlight the holes.  The flowers leaves and butterfly were all cut from the new CTMH Artiste Cricut Cartridge.  Of course, the piece of frayed burlap ribbon is a must on all my cards now it seems ;-)

Here is the second card, a plain and simple card using a retired paper pack from CTMH.  Perfect for a guy!

Happy creating!!!

Thursday, 25 October 2012

Christmas Card Workshop Sneak Peek!

Here's a sneak peek at one of the cards that we will be doing at my Christmas Card workshop.  I actually love this card and can't wait to show you this cool technique!

I have a couple of spots left and when full will set up a second workshop, so let me know if you are interested! Check out my full workshop list here .


Tuesday, 23 October 2012

Heart 2 Heart Challenges - Something Halloween

This week's challenge at Heart 2 Heart is to create something for Halloween and/or involving pumpkins.  I don't know why, but I had a very hard time with this one.  With my kids being older now and no longer doing the Trick or Treat thing, I don't have Halloween costume pictures to scrap every year, and also don't have the pumpkin picking and carving pictures to scrap either!

I ended up trying out a new technique with a suspended element in the window of a card, and I actually really like how it turned out!  I'm going to have to incorporate this idea in some Christmas cards I think!

Here's my spidy card.


It's a pretty clean and simple card, but I like the effect.  I think next time I would use either beige or black thread to string up spidy, the white is a little too visable.  Hmmm....I think I'm going to have to dig, I think I have some clear thread somewhere that I should try!

The paper is last year's Halloween paper pack.  The spider and the word Halloween are both cut from the Artiste cartridge.

Head on over to Heart 2 Heart Challenges to show us your Halloween creations!

Thanks for looking!!!


Thursday, 27 September 2012

Creative Workshops and Classes

Join in for fun times while learning new techniques and tips.
If you don’t see a class that you’d like, please let me know and I’ll try to arrange something for you!! Also, if there is something specific you’d like me to teach, let me know. 
All classes are held at my home in Strathroy, if you would like a class for friends at your home, let me know!

Wednesday November 14,  7:30pm-9:30pm – Christmas Cards (special price)  $15
          - 10 cards, 2 each of 5 designs, with envelopes.

Tuesday November 20, 7:30pm-9:30pm  – Brag Book Mini Album    $25
          - at each mini album class we will make a different type of mini album, you will learn a lot of great techniques.  This class will be a brag book that is perfect to give grandma or mom for Christmas!

December – Kids (10 and up) beginner scrapbooking class and/or cardmaking class
          - still working out the details for this, but please let me know if you are interested and I will let you know as soon as I know the details.

Tuesday January 15, 7:30pm-9:30pm – Interactive Card Class   $15
          - 8 cards, 2 each of 4 designs with envelopes (assorted events). 

Wednesday January 16, 7:30pm-9:30pm – Technique Scrapbooking Class  $15
          - 2 complete and embellished two-page layouts using a few new techniques.

Sunday February 3,  1pm–4:30pm – Kids (10 and up) Valentines Day Cards  $20
          - 20 classmate cards (a couple different designs) and one special teacher card
          - snack of cookies and milk/juice will be provided

Wednesday February 6, 7:30pm-9:30pm – Card Class    $15
         - one very special Valintine card
         - 6 other cards, 2 each of 3 designs with envelopes (assorted events)

Wednesday February 20, 7:30pm-9:30pm – Technique Scrapbooking Class  $15
         - 2 complete and embellished two-page layouts using a few new techniques.

Wednesday March 20, 7:30pm-9:30pm – Vacation Mini Album    $25
        - at each mini album class we will make a different type of mini album, you will learn a lot of great techniques.  This class will be a vacation mini ablum, perfect for a quick and beautiful way to capture vacation memories!

Contact Dorothy Seiler at dorothyseiler@hotmail.ca or 519-245-8119 for more information and to register.

Tuesday, 25 September 2012

Congrats Cards - lots of layers!

I don't know why but I always find congrats cards for a wedding to be the most difficult to find inspiration for.  I needed to make two cards for girls at work, I wanted to do something with their wedding colours but I was having a hard time feeling inspired to create.  Then I saw the Deconstructed Sketches sketch (DS70) for this week, and things came together very quickly after that!

Here are the two cards that I created using multiple CTMH stamps some CTMH paper and some paper and ribbon from my stash.


Monday, 24 September 2012

H2H Challenges - Anything Christmas


This weeks challenge at H2H is to create anything Christmas.  

I needed to work on my samples for the card class I'm holding in November so I decided to do a card for this challenge and kill two birds with one stone :-) I used one of our new stamp sets and cardstock.


I used a pattern from the new Make It From Your Heart publication from CTMH.  As you know, I love sketches!!  I love the sayings on this stamp set, here is what I put inside this card.


Head on over to the Heart 2 Heart Challenges blog to check out the other awesome Christmas inspiration.

I’d love to see your Christmas creations too!  Here's how to join in this week's challenge:

  1. Use mostly Close To My Heart products, though it doesn't have to be 100%.
  2. Create your Christmas creation
  3. Post your project to your blog or other online gallery.
  4. Come back here and directly link to your blog post, not your blog home page. 
  5. Mention Heart 2 Heart somewhere in your blog post indicating that you are playing along with us and link to our site. 
  6. Consider adding the H2H badge to your blog. We'd love to spread the word and see more crafters participating! 
  7. Finally, you have the whole month of September to join us on any of our September challenges and be eligible for our Top Ten!

Monday, 10 September 2012

H2H Challenges - Stressed out Biggie card

This weeks challenge at H2H is to create a "biggie" card, a card larger than your standard cards.

My card is 5x7 and it's Stressed Out - no, that's me this weekend, the card is distressed with my CTMH edge distresser.


I used a pattern from the new Make It From Your Heart publication from CTMH.  As you know, I love sketches!!  I didn't alter the pattern much as I wasn't feeling as creative as normal, but still the card came out nice if I do say so myself.  I used the Stella paper pack and the Love Life stamp set.

Head on over to the Heart 2 Heart Challenges blog to check out the other awesome inspiration, I'm truly humbled by they cards that the rest of the design team created this week!!!

I’d love to see your BIGGIE cards too!  Here's how to join in this week's challenge:

  1. Use mostly Close To My Heart products, though it doesn't have to be 100%.
  2. Create your BIGGIE card!
  3. Post your project to your blog or other online gallery.
  4. Come back here and directly link to your blog post, not your blog home page. 
  5. Mention Heart 2 Heart somewhere in your blog post indicating that you are playing along with us and link to our site. 
  6. Consider adding the H2H badge to your blog. We'd love to spread the word and see more crafters participating! 
  7. Finally, you have the whole month of September to join us on any of our September challenges and be eligible for our Top Ten!

Sunday, 9 September 2012

Anniversary Card - Florentine Paper

I needed a special anniversary card for my brother and sister-in-law and since it didn't need to go in the mail as it was being hand delivered, I could make it bulky!  I really like the 3D flowers from the CTMH Art Philosphy Cricut Cartridge, but I don't get to use them often because I'm not a big and bulky scrapbooker.

I used the Mojo Monday challenge sketch as a starting point, and between having that sketch and having all the papers and inks matched for me by using the CTMH Florentine paper this card came together very quickly!


Tuesday, 4 September 2012

How to make a hard bound book cover (as promised)

Well, as promised, I've got the instructions here for how to make a hard bound book cover.  I'm re-making the one I did for the little 3x3 mini I posted pictures of a week ago, but with different papers.  I took pictures all the way through the process and now I'll do my best to explain each step.  Let me know if you need any clarification or help.  Also, I'd love to do a class in town "all about minis" let me know if you'd like that!


First the supply list (and of course I forgot a couple in the picture.
- Outside cover cardstock - 8.5" x 4"
- Inside cover cardstock - 7.5" x 3"
- cardboard (whatever thickness you'd like) - 2 pieces 3.25" square and one 3.25" x .75"
- acid free glue
- small foam brush
- clear ruler (like the awesome CTMH one)
- bone folder
- scissors

Step 1 - Without glue, get everything laid out.  Take the 8.5x4 outside cover paper and lay it good side down, then using the ruler for spacing, lay out the cardboard pieces.  The outside edges are all 3 small squares on the ruler (or 3/8's of an inch) and the spacing between the 2 larger pieces of cardboard and the spine is 2 squares on the ruler (or 1/4 of an inch).  Leave the ruler sitting on the project like this and use it as a guide when you start gluing, it really helps a lot!


Step 2 - spread glue all over the first piece of cardboard.  Depending on the type of glue you have you may need to move pretty fast, I used a fast drying so I had to move really fast, a slower drying glue is ideal, but I didn't have any. It's best to hold the cardboard off the surface, so you don't make a huge mess and you can brush right to the edges.  Try to make it smooth, to avoid bumps on your cover. Also, don't totally saturate your paper in glue, that will make the whole project curl as it dries. In the next picture you can get a good idea of what is enough glue.

Place the glued piece of cardboard on the cover stock using the ruler as a guide and rub/press it down all over using LOTS of pressure to be sure it's totally stuck down on all the edges and everything.  Again, quickly before the glue dries. I use my bone folder for the this and even flip it over to press on the "good" side of the cover to ensure it's all stuck down well.

Continue for all three pieces of cardboard, doing the spine second.


Step 3 - Once you have all three pieces glued to the outside cover, we need to get it ready for wrapping.  To make the corners cleaner and easier to fold, chop off all four corners, leaving about 1/4 of an inch of paper at the corner (see the picture).

Step 4 - Using the bone folder, run it along all the edges to create a fold line.

Step 5 - Now fold up the edges, again using the bone folder is the easiest way to do this. Fold them all up first without glue.

Step 6 - Starting with the shorter sides, use your foam brush and some more glue to cover the flap with glue and then use the bone folder and lots of pressure to fold over and stick down the two short sides.  Do NOT do the long sides until after you've done the next couple of steps.

Step 7 - The next three pictures all describe this step, it's hard to explain so I hope the pictures help. They are the before, during and after pictures.  This is where you are going to "wrap" the corners so that you end up with a nice clean corner in the end.  Using the bone folder press in the corner kind of like what you do to wrap a present. It takes some practice to get this right, but don't worry, it's not that hard once you try!


Step 8 - Once you have all 4 corners wrapped, then you can glue down the flaps on the long sides. Use your fingers to make sure that you press down on the paper in the cracks of the spine, to be sure that the flap sticks there also.

Step 9 - Glue the inside cover on (which covers up all the glue and other messes you've made while folding and gluing. I use the foam brush again for this, to spread an even coat of glue all over the paper, right to the edges.  Then use the bone folder and lots of pressure rubbing all over to get the paper stuck down well.

Step 10 - (I know, I switched papers...) When gluing on the inside cover, be sure to use your fingers to really press down hard on the valley's in the spine to get the outside and inside covers sticking to eachother.  You will end up with it looking like this picture if you do this well.  Once everything is glued down, before the glue is 100% dry and brittle work the spine a bit by opening and closing the book.

Now it's time to add your inside paper, however you've created your inside papers, now is the time to add them, there are so many options and ways for this....I'd love to show you some of the more complex stitch bindings that we can do, but not today!

The mini that I created this cover for (which was posted a week ago) the inside pages were a maze book and I simply glued the back page to the back inside cover and voila, there's the book. Click here to see that project.

I hope you've found these instructions helpful!!! Happy crafting!


Saturday, 1 September 2012

And another Challenge Card

Never a "fun" card to have to make, a get well or thinking of you card.....I liked the idea of just keeping this one simple and the sketch from I Spy (ISSC31) was perfect for that.  I'm also entering this in the ScrapFit Workout #75 challenge which was to use twine.  

If you are looking for inspiration, these challenge blogs are great.

This card was made with the Roxie paper pack from CTMH which is now retired.  It wasn't one of my favourites when it was in the catalog, but now I'm really liking this one print.


More Challenge Cards...

I have a bunch more thank you cards to get created and sent out to thank all the wonderful businesses in town that have done so much to help our 1st Strathroy Scout group as well as our Strathroy Area Scouts in their efforts to raise money to get to the Canadian Jamboree next summer.  I have a hard time just reproducing the same card over and over, so the challenge blogs that are are  there are a great inspiration.

This card was inspired by Mojo Monday's sketch and the colours from the Play Date Cafe.


I love the new burlap ribbon from CTMH, isn't it just so great looking!!!!

Monday, 27 August 2012

H2H Challenge - Back to School - Mini Autograph Ablum

This week's challenge at Heart to Heart Challenges is all about Back to School.  I decided to make this cute little autograph album that is just the right size to fit those little school pictures in that the girls love to exchange.  It also has lots of little tags and other space for special friend messages to be written in it.

Here's a picture of the front on the book. It's 3.25 inches square and about 3/4 of an inch thick.


The inside pages are made using the directions from here to make a meandering book, but instead of binding with a ring binding (I so want/need a Cinch!) I made it into a hard covered album.  Of course, because I created this on the one day I had home in between camping trips I totally forgot to take pictures of it in progress.  I do promise though that I will make another one and I'll post the directions with pictures for making a hard covered album sometime very soon.  Trying to write out the directions will only confuse, pictures are worth a thousand words!

Here are some more pictures of some of the parts of the book.

First the inside first page, two different views of it.


Now one of the inside pages.


And here are the tags for in the book, all the tags are cut using the CTMH Art Philosophy Cricut Cartridge.


Do you have any back to school projects that you've been working on?  Head on over to Heart 2 Heart Challenges and check out the other great inspiration and post a link to your work, I'd love to see it!!

CTMH products used:
Avonlea patterned paper
Slate and Whisper cardstock
Colour-ready seam binding ribbon
Olive Alcohol marker (to colour the ribbon)
Black and Sweet Leaf ink pads
Art Philosophy Cricut Cartridge
August Stamp of the Month - Baroque Borders
National Stamping Month Special Stamps - It's your day (available until the end of September ONLY)
Friendship blessings stamp set
Natural Hemp
Burlap Ribbon

Tuesday, 21 August 2012

New Alcohol Based Markers

It's been a busy time here doing the last of the summer vacation things!  I haven't had much time to post anything, but I wanted to quickly pop in and show you this video about the new alcohol based markers from Close to my Heart.  I just got a couple here, I've never used alcohol markers before so I'm having some fun playing with them!

Let me know if you'd like to try one out.

Tuesday, 14 August 2012

Heart 2 Heart Challenges - Dog Days

This week at Heart 2 Heart the challenge is Dog Days, use an image of an animal in your artwork, take it up a step, even use a dog!
Head on over to Heart 2 Heart to check out the other great artwork from the design team and other entrants....and don't forget to enter your own creations!

Here's my page, pictures from a trip to visit Grandma this July...and of course, Grandma's baby (dog) Roxy was posing for pictures again!


I got the inspiration for the shading/colouring of the flowers and hearts from a talented fellow consultant named Gloria Rogers.  Here is a close up of some of the flowers.  I used the CTMH sponge daubers and CTMH dye based inks to do the colouring and shading.


So grab your CTMH supplies, get creative and come on out and join us at Heart 2 Heart.

Wednesday, 8 August 2012

La Belle Vie Birthday Card with sewing and Mojo Monday

Wow, summer is just flying by!! I can't believe we are already well into August.  I feel like I haven't been able to enjoy my summer yet, I haven't been able to de-stress enough yet I think!  Tonight I took a break and just played with paper for a little bit, I needed a birthday card for a friend and thought that something from the La Belle Vie would work great.  I used the Mojo Monday sketch for the inspiration for this card.


Unfortunately, it's late here, so no natural light, which makes this card look a little washed out. This next detail picture was able to capture the colours better.


I don't usually "do" pink but the pink in this kit is a soft pink and I actually like it.

I got out my sewing machine and stitched around the edges of all the pieces of this card...doing that circle was not fun!  A quick tip, when you are done, pull the thread from the front through to the back by pulling on the end thread in the back, then use a small piece of tape to tape down the threads on the back on the paper, that way you won't have any stitches coming undone on you.

Thanks for looking, hope you like the card!

Wednesday, 1 August 2012

Avonlea Layout - Great Sketch to try!

I just love this paper pack....with the help of the Heart2Heart Scrapbook sketch challenge this layout came together so easily and I love the look of it.


I was so upset when I finished the layout I was so upset I forgot to use my own Tip and Trick to save some of the beautiful exclusive Avonlea Teal paper!  I did save some of the Avonlea Off White paper though by not using it as the full base page, instead I used a plain white cardstock as the base and cut all the strips of cardstock and patterned paper and then attached them to the white, completely covering it. All three of the patterned paper used in this layout are from the same sheet of paper, I love those Zip Strips!

Check out the sketch from Heart2Heart and if you're inspired to create a layout from it, click here to launch the challenge blog and post/link to your creation, I'd love to see it!


This layout is also inspired by the Frosted Designs:Fabulous Friday Challenge which this is to use a single word for the title of your layout.

Monday, 30 July 2012

Heart 2 Heart Challenge - Using Scraps

This week's challenge at Heart to Heart is Scrap Angels....using your scraps.  I created a card from the scraps of my Cruising paper pack (which is as of just a couple of days ago, no longer available).


I created the pattern using strips of left over paper.  I forgot to take pictures while I was working on it to make this easier to explain, but I'll try.

Start with a piece of plain cardstock (it won't be seen, so even a piece that has a "messed up" stamping attempt on it will work.  Cut that piece to the size that you want the patterned piece to be in the end.  If you have a zyron sticker maker large enough you can run it through to make one side sticky (which makes the whole project faster) or you can do what I did and just use glue.

In my example I started with three red strips, one is mostly under the circle.  Put one across the project and then the other two at right angles to it, one on either side.  Now you just need to continue building up the pattern using your strips of paper.

There are so many ways to do this, you can use different sized strips, like I did, or you can make all your strips the same size.  You can be totally random with what strips you choose or you can choose to do each layer in the same paper, like I did.  You can also substitute ribbon or even a stripe of glitter or pearls for one of the strips.  So many options!!!!

Get out your scraps and have fun creating!!!  I'd love to see what you create, so don't forget to post your creations on the Heart 2 Heart Challenges blog, just remember to mostly use CTMH products and to mention our challenge blog in your post.