Classes

Dorothy's Creative Classes and Workshops
Click here for more information about my classes and workshops!

Thursday, 17 January 2013

Sunburst Cards -Mojo Monday Sketch

Just finished these, another card design for my card class coming up soon.  For this one I used Mojo Monday sketch #276 and I just had to try these sunburst cards that I've been seeing everywhere lately.


These were not all that difficult to do, just a lot of fiddling with adhesive :-)

The sunbursts were made from rectangles 1.5" x 4" that are then cut in half corner to corner to make two triangles.  The strip of grey dot paper on the bottom is 1.5" x 4.5" and the strip of patterned paper on the right is 1" x 4.25".

To make the cards, start with your card base and draw a line in pencil 1.5" from the bottom of the card and 1" from the right.  This is so that it's easy for you to see the area that needs to be covered by the sunburst design.

Now you need to arrange your triangles until you get it set in a way that covers all the area that needs to be covered, then you can glue them down.  
HINT: Not all the points have to meet, it actually works best if some of them are slightly longer, especially the shorter pieces on the left of the card.

Once all the triangles are glued, trim the tips where they meet if they are too bulky, then trim all the pieces all the way around the card to make it even.  

Now adhere the finishing pieces on the bottom and right of the card.

The sentiments are all cut with the Aritste cartridge and they are all from the same stamp set from CTMH.  The paper is a retired special pack from CTMH from last spring.

Happy crafting!!

Please contact me if you are interested in attending my card workshop or any of my other workshops.


Wednesday, 16 January 2013

One Sketch two Cards

Hi again....I know....more cards.  I am missing my scrapbooking, but I'm having fun making cards too! Sometimes I wish there were more hours in each day so I'd have more time to play!

I'm busy preparing for two private card workshops as well as the public one I'm holding in my home, and I was looking around from some inspiration.  I found a sketch on Deconstructed Sketches blog and got inspired.  I created these two cards with the exact same pieces, just moved them around a little bit.  I love the ability to use the inspiration from a sketch to create multiple cards.


Monday, 7 January 2013

Couple of cool stamp and ink techniques and Mojo Monday sketch

Hello again!  I needed to make a couple of congrats cards for two co-workers who are moving to bigger and better things within the organization.  I knew that I wanted to use resit embossing, just because I haven't used my heat embosser in such a long time, but I needed inspiration for the card.  I found it in the Mojo Monday #275 sketch!

Here's the card, then I'll tell you how I created it.


To create the panel that is the background of this card, I started with a piece of colonial white cardstock 1/4 inch smaller than the card front.  I then used a stamp from the Friends stamp set from CTMH and stamped/embossed with clear embossing powder.  This was just done with random stamping, making sure that some of them go off the edge of the paper.

I then used 4 ink colours, Honey, Sunset, Ruby and Barn Red and used wedges of sponge to randomly ink up the entire piece of paper, making sure to really rub it in around the embossing. Start with the lightest ink and move to the darkest for best results, and use a different sponge for each colour.  I have a baggie of sponge wedges, with a small piece of paper with the colour written on it stapled to each one, works great!

The other papers on the card are Autumn Taracotta, Ruby and Desert Sand.

The medallion with Congrats in it is the same stamp used on the background, but I masked the centre so that I would have a spot to stamp the word congrats.  To mask part of the stamp, stamp it on a scrap piece of paper and cut out the centre, then using removable adhesive, position the centre on the piece you are going to stamp.  Then the beauty of the clear stamps comes into play, you can line things up and stamp the image over that piece perfectly, then simply remove the scrap piece from the centre and then stamp the congrats.

I used the sponge wedge and Barn Red ink to ink the edges of all paper pieces and the card itself, just to finish things off.

Here is the inside of the card and below is how I did this:


Using one of the sentiment stamp sets from CTMH I placed all the words that I wanted to be part of this down on the page face down as they would be stamped, then once all arranged, simply press the block to the stamps and ta-da you have a custom made stamp to ink up and use :-)

Friday, 4 January 2013

Valentines Day Card Workshop for Kids

Date:  Sunday February 3
Time: 1:00 pm – 4:30 pm
Where: At my home
Cost: $20

Each will go home with 20 classmate cards, 5 each of the 4 designs, and one special Treat Tube card for their teacher.

All supplies required as well as a snack of cookies and milk/juice will be provided.

The classmate cards are 3x3 inches and use some basic stamping, cutting and adhesive techniques.


Please email me at dorothyseiler@hotmail.ca to reserve a spot.

Below are close ups of each of the cards.  I used some sketches from some challenge blogs as my inspiration for each of these cards.  I will note with each one which challenge inspired it.

This card was inspired by sketch #67 at Freshly Made Sketches.


This card was inspired by sketch #191 at Unscripted Sketches.

This card was inspired by sketch #83 at Deconstructed Sketches.


This card was inspired by sketch #44 at Retro Sketches.


The treat tube for teacher is inspired by the Whooo's Your Valentine January special from Close to My Heart.  All the stamps as well as the silver glitter paper are all from the Whooo's Your Valentine kit also.

Save your spot soon, the size of the group that I can accommodate is limited!

Tuesday, 25 December 2012

Resolutions

Happy Holidays to everyone!!!  I hope your holiday's are going well so far, and that the rest of the next week and a bit are full of love, laughs, friends and family!

I've always been very bad at the whole resolution thing, I think it's the fact that in order to make a real and lasting change in your life it has to be something that you are doing for reasons that resonate and are important to you, not just because it was time to make a New Year's resolution. 

My sister posted an idea on Facebook a week or so ago about having a mason jar and some note squares and writing the good things that happen each and every day down and storing them all in the mason jar for review the next year.  This is a great idea for remembering what's important and realizing that there are so many good things happening each and every day.  My husband has also started something over this last year called a "rainy day letter".  It's along the same principle, that you keep note of the good things that happen each and every day and the things that make you happy, but rather than waiting until the end of the year to read and review them, you take it out on a rainy day, when you are feeling down and out.

I decided to combine the two and I made this for my hubby for his Christmas present.  I think now I'm going to make one for others in my family, including a cousin just starting her journey through cancer.


Here's the box from the outside.  It's a drop spine box that I made from scratch using some book board that I had in my stash and paper from the Pemberly paper pack from CTMH.


Inside the drop spine box is a hard covered journal that is made with a chain stitch binding.  The journal fits perfect inside the box and leaves lots of space to add pictures and other bits and pieces.
 

Here is a picture of the spine of the journal showing the chain stitch binding.  Above is a view of how nicely the journal opens because of the chain stitch, it opens flat and is very easy for writing in!

I'm waiting for the CTMH Spring/Summer 2013 catalog to arrive here before I design the vacation mini-album that I'm going to offer for my March class, but ideas are already going through my head and I'm thinking that maybe a drop spine box with both a journal and a mini-album inside sounds great and I'm sure once the catalog arrives (I can't wait!!!) and I see the wonderful summer and vacation papers and stamps in it that I'm going to have tons of ideas going through my head!!!

 Sending you wishes for happiness and joy for the rest of the holiday season and for the entire new year!!!

Friday, 23 November 2012

I wish I owned embossing folders.....

One tool that I do not have in my scraproom "yet" is an embossing machine of some sort...I have a couple of the old fashioned embossing plates and an embossing stylus, but making this card reminded me of just how long and tedious it is to use those!  Some day I'll collect enough $ together to get myself one...until then, don't think I'm going to do this hand embossing thing again!

Here's the card I made while watching Big Bang and Glee with the kids last night.


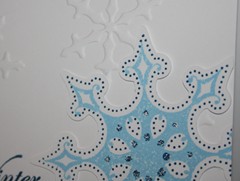
I only embossed 4 snowflakes on the card base and that took forever!

The large snowflake is cut with my Cricut Art Philosophy cartridge and stamped with two images from the snowflake stamp set.  I love the two stage stamps and the look you can get so easily with the clear stamps.

I'm entering this card in the Unscripted Sketches piggyback challenge #185 as well as the CAS-ual Fridays challenge CFC79.

Monday, 19 November 2012

H2H Christmas Challenge!

This week's challenge at Heart 2 Heart is another Christmas week.

It's amazing how quickly Christmas is sneaking up on us so fast!  What crafty things are you doing to prepare for Christmas?  Are you making a special album for someone, beautiful hand made cards to get in the mail, or some other project?

I've been busy with lots and lots of cards, I have had 3 Christmas card classes and had a great time at all three, now I need to make up some more and get my cards in the mail :-)

Because I've been so much in card mode, I decided to do a layout for this challenge, and I'm happy I did.  I now have a layout ready to just add this year's pictures to.  The photo mattes I just adhered with removable adhesive, so that I had some options depending on the pictures.  The sketch for this layout is from the CTMH Make it From the Heart book, great inspiration and I love that I can get 7 pictures on this layout!


Head on over to the Heart 2 Heart Challenges blog to check out the other awesome Christmas inspiration.

I’d love to see your Christmas creations too!  Here's how to join in this week's challenge:
  1. Use mostly Close To My Heart products, though it doesn't have to be 100%.
  2. Create your Christmas creation
  3. Post your project to your blog or other online gallery.
  4. Come back here and directly link to your blog post, not your blog home page. 
  5. Mention Heart 2 Heart somewhere in your blog post indicating that you are playing along with us and link to our site. 
  6. Consider adding the H2H badge to your blog. We'd love to spread the word and see more crafters participating! 
  7. Finally, you have the whole month of November to join us on any of our November challenges and be eligible for our Top Ten!